
Not Enough Disk Space iMovie Error? (Solved)
So all Apple users know about iMovie, which is a default app in all Mac OS devices. This application is a video editing software, and most of the users rely on it for this function. However, due to the heavy use of this feature, you might come across an error message when you try to add a file to it, saying, “not enough disk space iMovie.” This message indicates that the space in the specific application is full, and you can’t add any more files to it.
But don’t worry, we are here to help you out in case you face this situation because there are numerous methods that you can opt for to get iMovie to start functioning normally again. Let’s take a look.
Why Is iMovie Disk Space Full?
Now, before we move on to fixing this issue section of the article, it’s essential to understand the specifics behind it. iMovie was released in 1999 and has developed ever since. It only works if the user has a Mac OS operating system on the device. Also, if you don’t have Mac OS and were planning on downloading this app, then it’d cost you $80, but those with this system don’t have to spend any money because it’s a default app. So here are a few reasons why this app takes up so much space on Mac.
- A lot of rendering files could be occupying space.
- You might be dabbling in various projects and videos.
- There could be several saved or unsaved data on the app.
- Mac’s storage management might be causing issues, which led to the increase in storage space.
- If you’ve made changes in the preferences and settings of the app, then it could be the reason for this error.
- The app might have stored cache, old and temporary files, etc.
How to Clear Disk Space for iMovie?
For this application to function efficiently, it requires at least 25 GB of free space. However, sometimes this message might pop up even if there’s space. So as I mentioned earlier, there are numerous ways to clear the iMovie storage full issue. Let’s see what all they comprise of.
1. Clean the Disk Space
The first basic thing that you should try is to clean the disk of unnecessary files that are useless, duplicates, cache, or so on. However, this is a time-consuming task, and it’s much easier to use a tool for cleaning the storage rather than doing it manually.
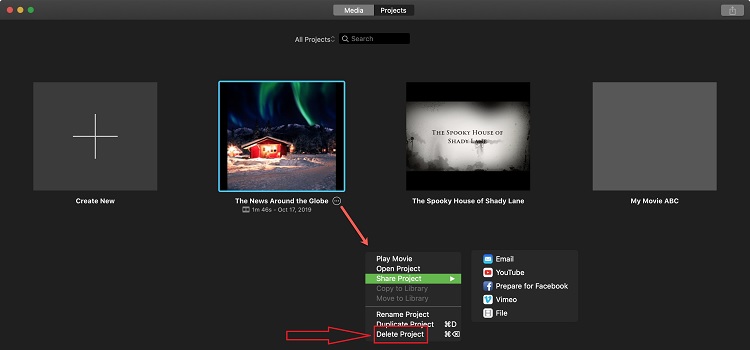
2. Delete Old Projects
A lot of people create several videos or projects and then forget about them. So all these outdated files that are no longer of use take up the space. Here’s how you can delete them –
- Open the app through Launchpad or Spotlight.
- Search for the project you wish to delete.
- Click on the three dots beside the project’s name and choose “delete.”
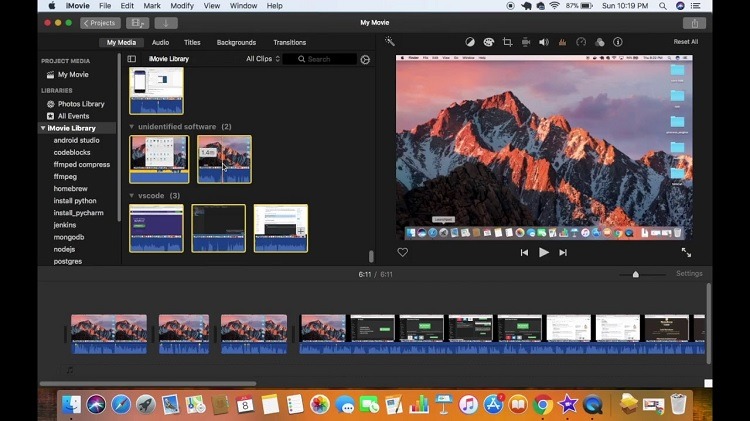
3. Delete iMovie Library
The third way is to delete the app’s Library itself, which stores all the video files and photos, especially after the 10.0 update. So if you don’t need any of those, getting rid of them is the best way to free up space.
- Start the app and open a project.
- In the sidebar, click on the iMovie Library, where you’d find all the saved clips.
- Right-click on the files you want to remove and select the “Delete Media from Event” option
4. Delete Render Files
A lot of people don’t know this, but even the rendered files take up space, and eliminating these won’t affect your video files in any way, except that they may affect their performance for some time until the rendered files are generated again.
- Click the app’s menu and go to Preferences.
- Click on the delete button beside the render files and again click delete when the new pop up appears.

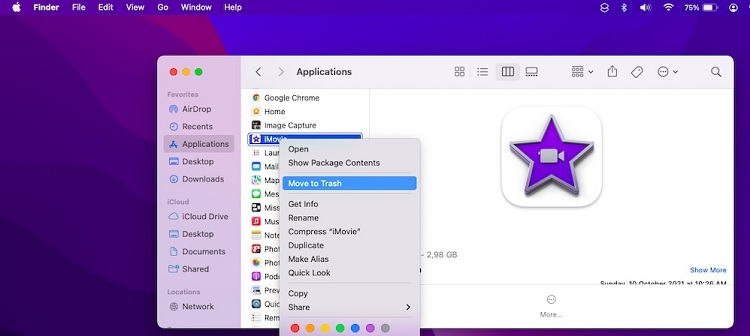
5. Update/Reinstall the Application
As I previously said that sometimes the “not enough disk space iMovie” message pops up even if there’s space, so in that case, you should either update or reinstall the app. To reinstall, follow these steps –
- Locate the app in the Applications folder by opening Finder.
- Move the icon to the trash.
- Now, click the Go Menu in Finder and choose Library. If you can’t find the Library, then hold the Option key in the menu, and the Library will appear.
- Find the files related to iMovie in the folders, such as cache, container, preferences, and so on, and delete them by moving them to the trash.
- Back up the important files beforehand.
- Empty the bin as well.
- When you open the application again, it will say that the iMovie is damaged, just click on Repair and the issue would be solved.
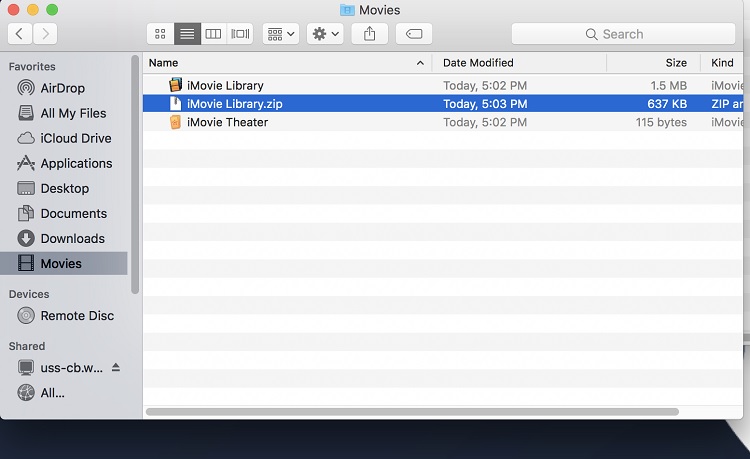
6. Shift iMovie’s Library to an External Drive
You might have noticed that the app’s Library is in the Home Directory’s Movie Folder. Click on Finder and navigate to Movies and click on the Library option. Since you can’t change the app’s location, you can shift it to an external drive. Connect an external drive to the Mac and drag the essential files manually to it. Then delete the ones left in the Library and avoid the error indicating there is not enough disk space available at the selected destination iMovie.

7. Delete Duplicate Files
Sometimes, you might have two copies of the same file which is also the reason for iMovie disk space full. So here’s how you can do this –
- Open the app.
- Click on File and choose the “Consolidate Media” option.
- Then there are three options under this: Copy the Clips, Copy the Events, or Move the Events.
- Select the “Move the Events” option and shift them to any location you want, apart from the one where they are originally. When you do so, some of the files would still remain in the original place, indicating that these are the duplicate files.
- Delete these duplicated files. If there’s no file in the original location after you move the files somewhere else, that means you don’t have two copies of the same file.
8. Manage the Storage and Resources
It’s a significant step to manage your Mac’s storage, and this is the way to do it –
- Click on the apple icon located on the desktop’s top and select the “About the Mac” option.
- Now, from the options, check the Storage tab to check the space available.
- Choose the “Manage” option under the Storage tab, and a lot of options will appear.
- You can select emptying your trash, optimizing the storage space, and reducing unnecessary things.
Conclusion
This was all you needed to know how to fix the error “not enough disk space iMovie” if you encounter it while using this app. You can try out all these options until you find the one that you find convenient and the one that works the best for you. We know how much people rely on iMovie for their video editing requirements; therefore, solving this issue is the primary concern.


