
How to Free Up Disk Space | Windows PC & Mac (Updated)
A lot of people have come across a message saying that there’s not enough disk space while working, and it’s quite a scare because you might be working on something important, etc. Also, decluttering the disk isn’t such an easy task if you go about it manually, so those of you who are looking for alternatives on how to free up disk space should try out the methods mentioned in this article below. They’d act as a boon because it’d make your job so much easier.
What is Disk Space? Why is My Disk Storage Full?
Disk space refers to the amount of data that your hard drive or hard disk can store without causing issues. When you store a lot of files or other things on the disk, it takes up a lot of your storage capacity leading to the error that indicates that you can no longer save files there. Disk space is always measured in Gigabytes (GB).
Why Should I Free Up Space on Computer?
There are a lot of benefits to having more storage capacity on your hard disk because it allows the device to function efficiently. If the space is 90% or even 85% full, it will create issues while you’re working. Therefore it’s recommended to have at least 15% storage capacity left to leave enough space for temporary files. All the junk that takes up space isn’t because of the files you save but also because of the browsers you use or the programs you have installed since they also add data to the disk.
Even a Windows update would reduce the space you have, so it’s essential to clean temporary files, old updates, installations, etc., from your device. If there’s no space for the hard drive to store files, it’ll fragment itself and save them wherever they find space, which would be a hassle.
Also, if your RAM needs to offload the work in the drive, you’d need a free place for it to store that; otherwise, the computer would freeze. During this offloading process, the computer will slow down in speed, but it won’t stop working if you have space.
How to Free up Space on a Hard Drive?
As I mentioned earlier, there are numerous ways to clear space on your disk or hard drive, so let’s look at a few of them that would assist you in doing so.
Check Disk Space
The first thing is to check how much space you do have in the drive. Here’s how to go about this process for PC, Mac, and Windows 10 systems.
For PC:
- If you aren’t using a mouse, swipe in from your screen’s right-hand edge and click on Settings, and then select PC Settings. For those using a mouse, take the cursor to the screen’s lower right corner, move the cursor up and click on Settings. Now choose PC Settings.
- Click on the PC and Devices option and choose Disk Space.
- Now, you can see the amount of free space you have under the “free up space on this PC” heading.
For Windows 10:
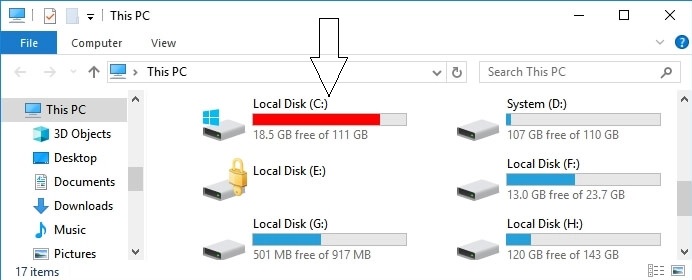
- On the taskbar, click on the folder icon.
- Then, select This PC from the left panel.
- Locate your C: drive under the Devices and Drives tab and check the amount of clear space left.
For Mac Users:
- Click the Apple icon in the upper left corner of the Desktop, and click on About This Mac.
- Select the Storage tab to see how much space you’ve used.
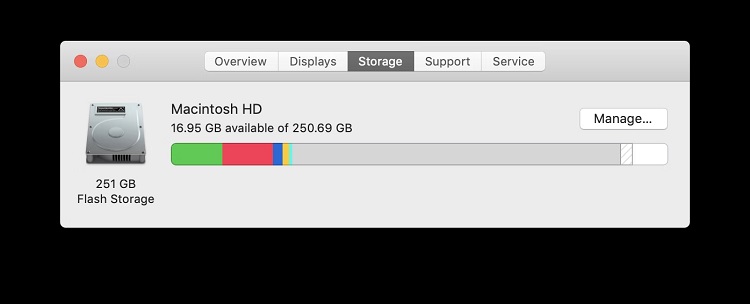
- This would also tell you what all you are storing.
Use disk Cleanup
To get rid of junk files from your device, you’d need to follow these steps –
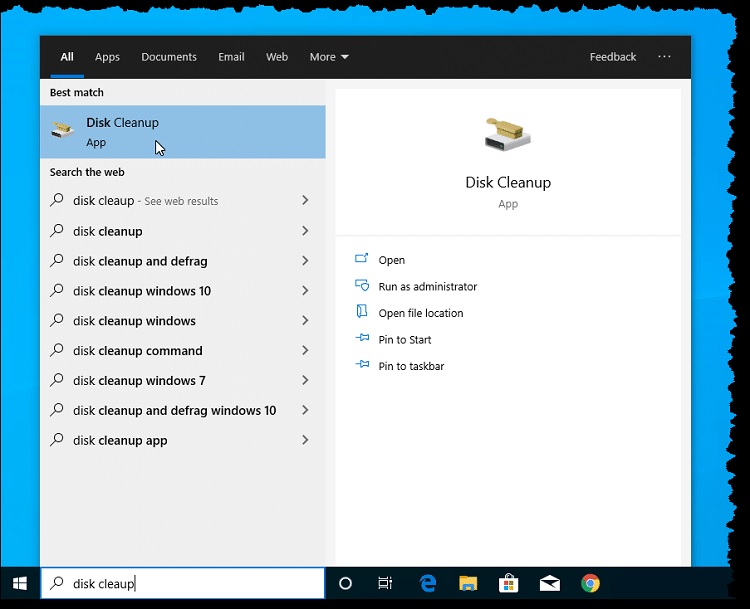
- Click the Start button and search for “disk cleanup,” and then click on it.
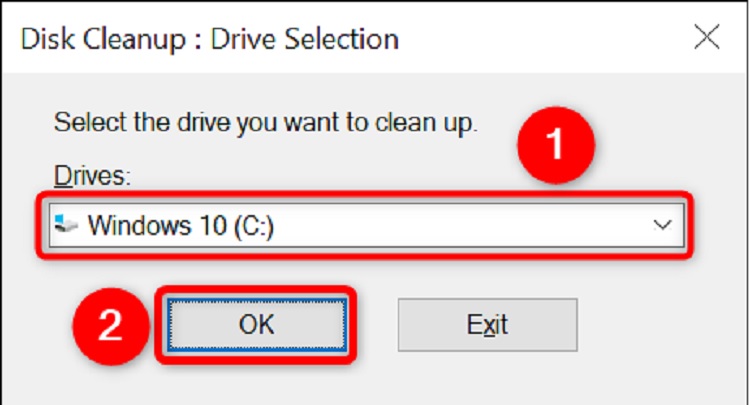
- If asked, choose the drive you wish to clean and select OK.
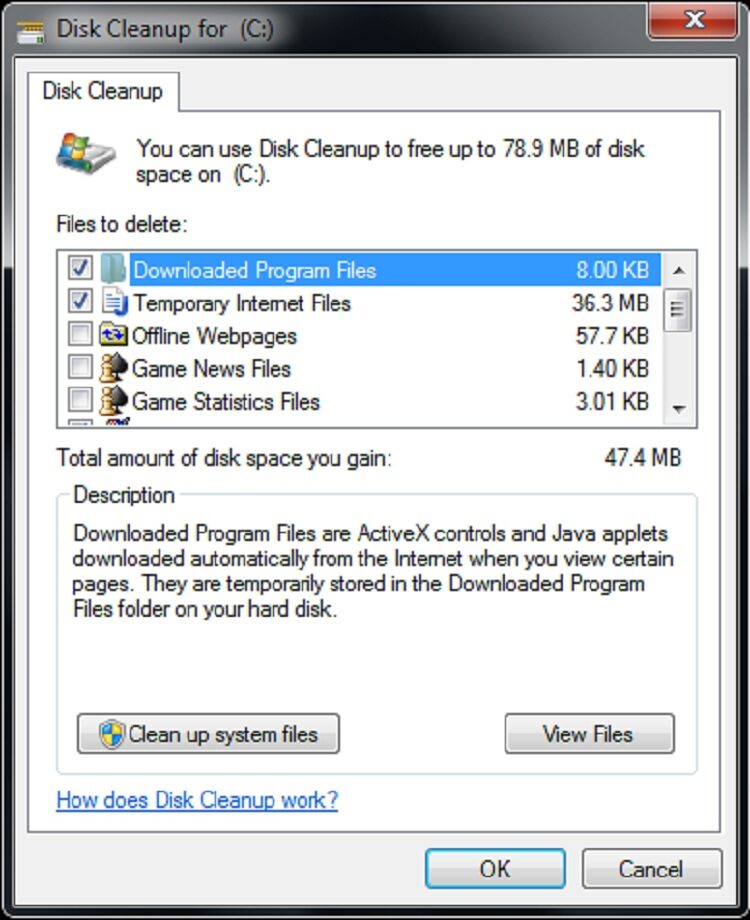
- In the description section of the disk cleanup, click on the “clean up system files” option.
- Again, choose the drive you wish to clean and click on OK.
- Now, in the disk cleanup tab, select the boxes of the file types you wish to delete and click on OK. If you want to get rid of data from the previous Windows installation, then choose the “Previous Windows Installation” option. In addition, don’t delete Windows ESD Installation files in any case.
- Click on Delete Files when the pop up appears.
- Navigate to the Computer in File Explorer and open the disk you cleaned up, then click Refresh.
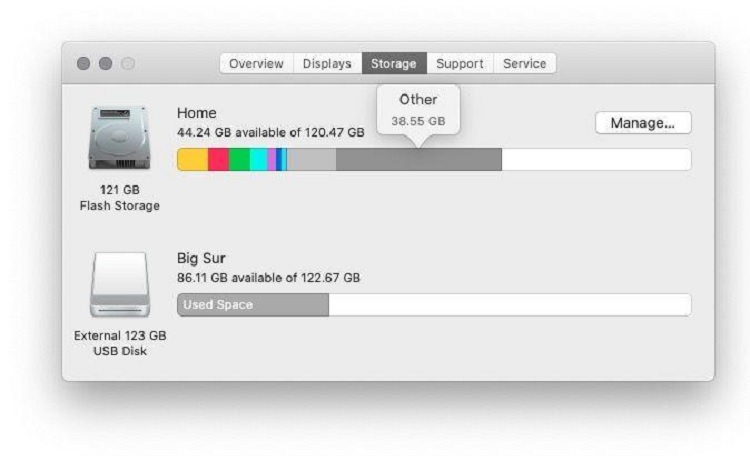
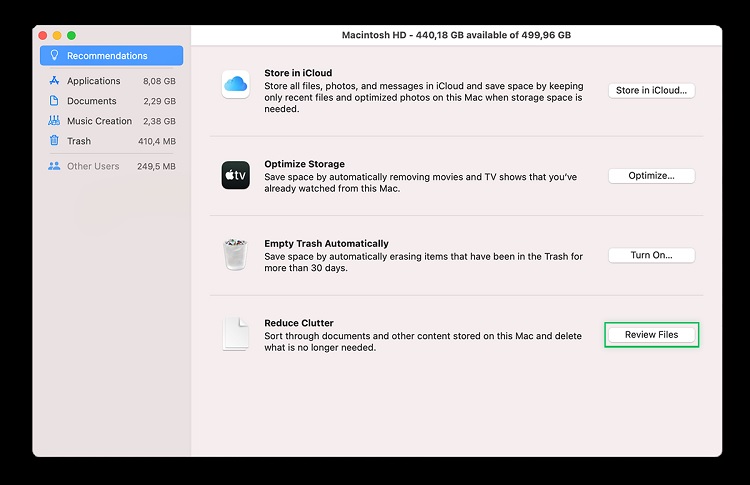
For Mac users, you can use the Optimize app instead.
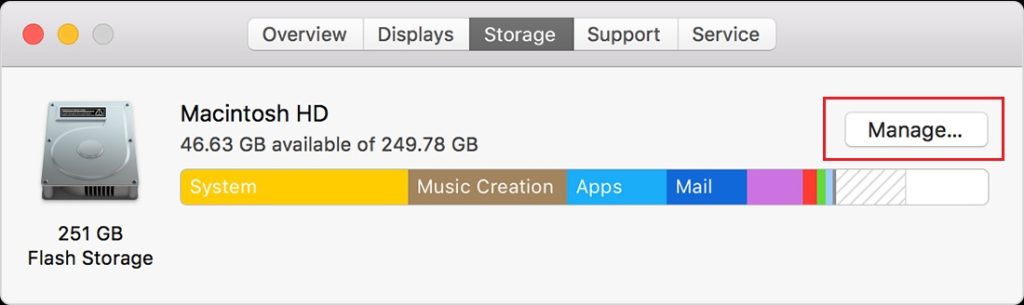
- Click on the Apple logo in the upper left corner, and then select About This Mac.
- Select Storage and then click on Manage.
- Choose the Optimize option under the Optimize Storage tab to get rid of movies, videos, and so on.
- There are other options available in this app, such as emptying trash automatically, reducing clutter, and so on, that you can use as well.
How to free up space on Windows 10?
Windows Storage Sense is what you should use for cleaning up the space if you have Windows 10. It’s an all in one feature which eliminates unwanted files easily and efficiently. There are two ways to use this tool: Use it on demand or Set it up to run automatically.
Use Storage Sense on Demand
If you want to have a say or control over the files being deleted or don’t want to clean the device often, then this is the ideal choice.
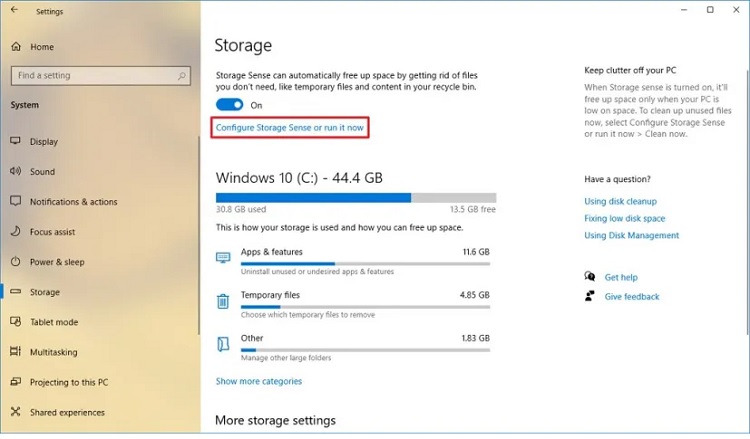
- Open Settings by tapping on the Windows icon.
- Select System.
- Then, click on Storage from the menu on the left.
- Now, select Configure Storage Sense or Run it Now under the Storage Sense tab.
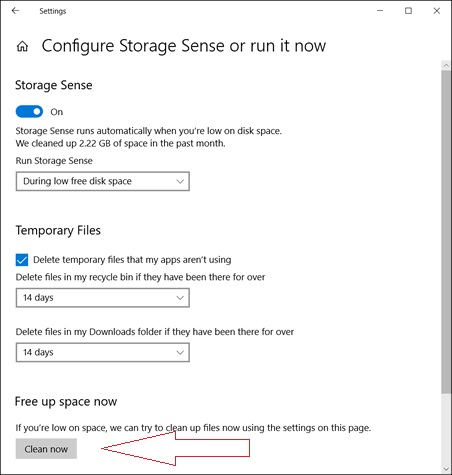
- It’s time to configure your preferences now.
- Delete temporary files (it’s enabled by default).
- Get rid of files from your Recycle Bin (you can delete files, which have been in the bin for a day, 14 days, 30 days, and so on.)
- Delete files in My Downloads folder as well (files that haven’t been used for a day, 14 days, 30 days, 60 days, etc.).
- Click on the Clean Now option to permanently delete these files.
How to Run Storage Sense Automatically? Those who frequently free up space on laptop should automate the process. Here’s how –
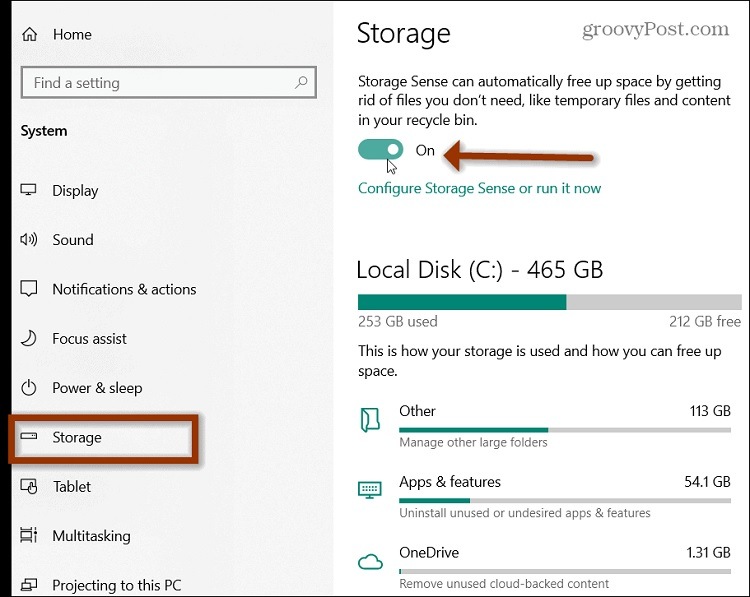
- Go to Settings by clicking on the Windows icon.
- Select System.
- Click on Storage from the list available on the left.
- Choose Configure Storage Sense or run it now under the Storage Sense tab.
- Pick your preferences, such as when this system should run, what it should delete, etc.
- Once you’re done with this, turn on Storage Sense.
- Under Run Storage Sense, there’s a dropdown to choose how frequently you want this feature to run automatically (only when the disk space is low, every day, every week, or every month.
- You can also click Clean Now to start your device’s first scan.
Delete Temporary Files
The method mentioned above also gets rid of temporary files, including webpages or the files on your hard drive, but it doesn’t remove the files added by external apps, such as Google Chrome, Mozilla Firefox, etc.
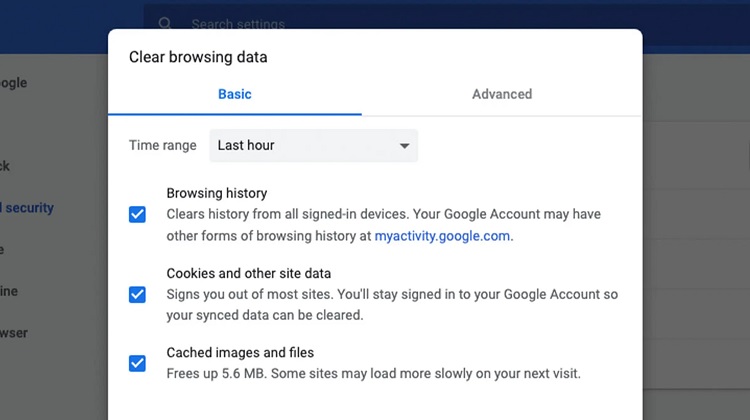
- Go to Google Chrome, and click on the three dots beside the Address Bar to open the Settings menu.
- Now, click on More Tools, and then select Clear Browsing Data.
- Choose the data you wish to delete and then select Clear Browsing Data.
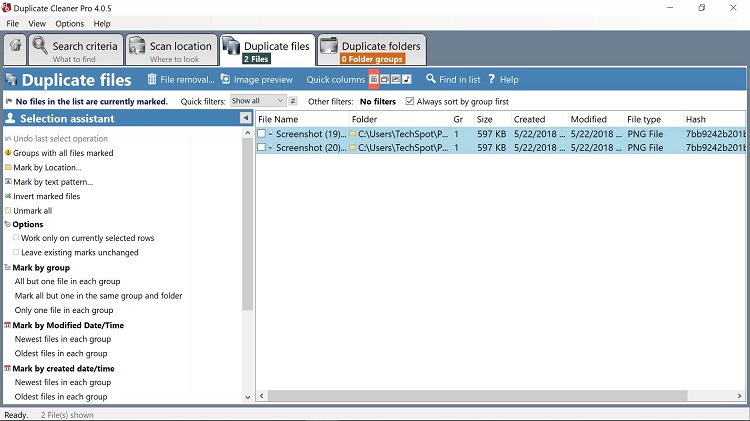
Remove Duplicate Files
If you’re wondering how do I free up disk space without deleting apps? This option is quite useful. Due to some or the other reason, there are duplicate copies of the same file in your system, which takes up unnecessary space, and it’s better to get rid of them. Duplicate Sweeper is one of the best ways to do so because of its advanced technology yet simple interface, which works efficiently in scanning your device for all the duplicate files.
You can either choose to select individual files yourself for deleting them, or allow the tool to do so on the basis of your preferences. You can find all the duplicate files in the recycle bin or trash, so if you wish to restore any of them, you can.
Uninstall Unused Desktop Apps
Another way to get more storage capacity, delete the apps that are no longer useful.
- Click on the Start button, go to the Control Panel, select Programs and then click on the Add or Remove Programs option.
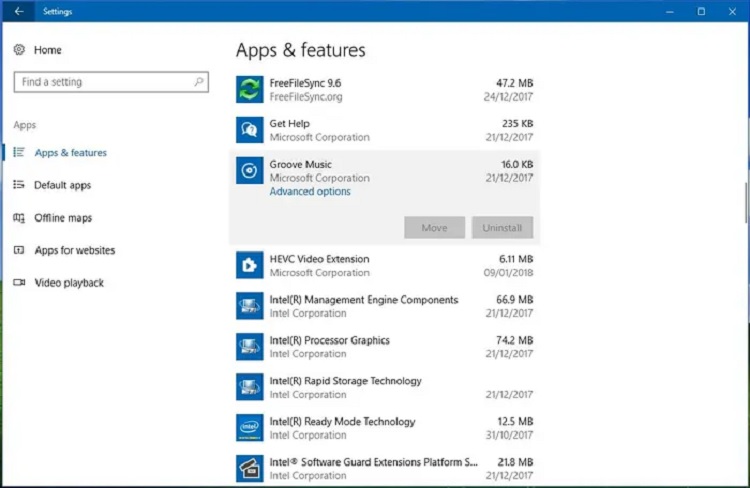
- Choose one app from there and click on Uninstall. You might get a Change or Repair option for some programs instead of uninstalling. You can click on this option, and it’ll ask for a password or confirmation, fill it in, and you’re good to go.
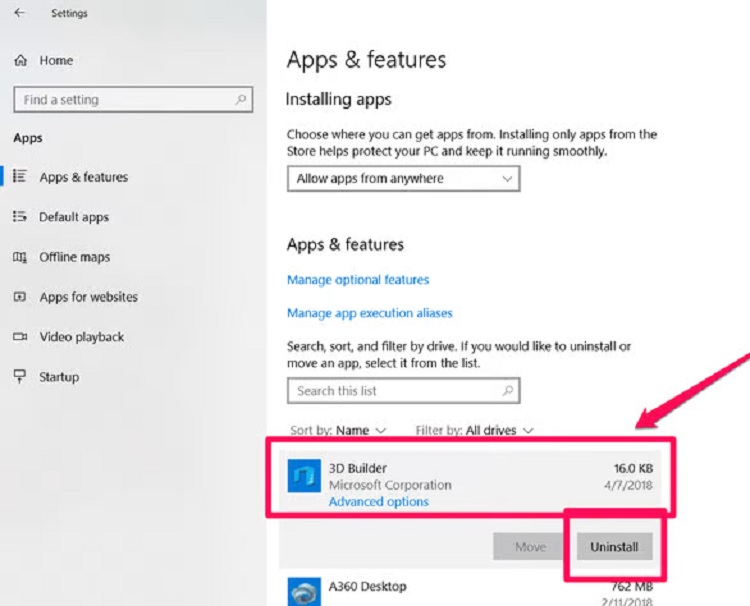
- In case you don’t find a particular app in the list, then it might be because it isn’t a part of this Windows version. So you’d have to see the information that came with that program to uninstall it.
Uninstall Unused Windows Store Apps
You can also delete the store apps that come with Windows if they aren’t of any use.
- If you aren’t using a mouse, swipe in from your screen’s right hand edge and click on Settings, and then select PC Settings. For those using a mouse, take the cursor to the screen’s lower right corner, move the cursor up and click on Settings. Now choose PC Settings.
- Click on Search and Apps, and then choose the App Sizes option to know which app is taking up how much space in the disk.
- Once you’ve decided which app to delete, click on it and select Uninstall. The app would be deleted from your user account.
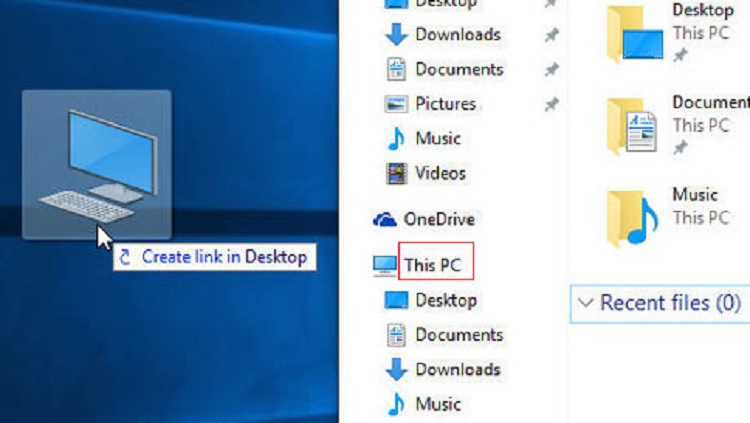
Archive or Delete Unnecessary Files
A lot of time, we wish to keep photos, videos, or other such memories safe, but we are also facing issues because it takes up a lot of space. So it’s better to shift these to an external drive, DVD, cloud storage, etc., and have backups. It’s a win-win situation.
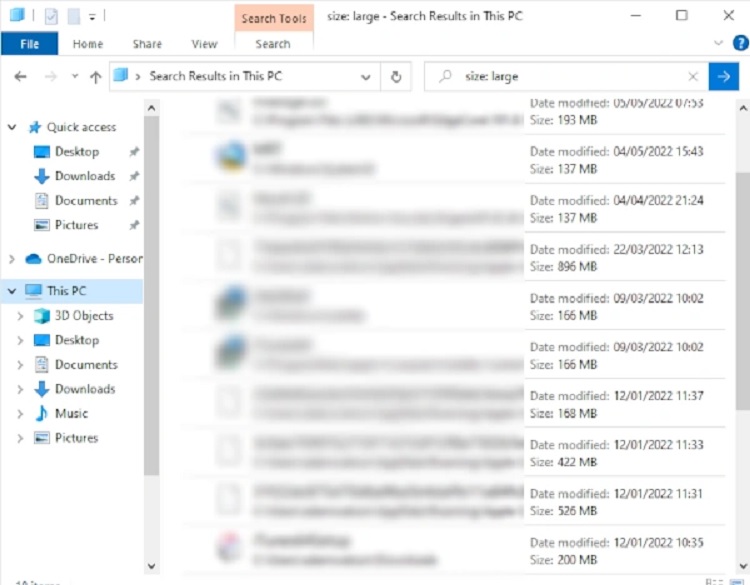
- Swipe in from the screen’s right edge and click on Search or if you’re using a mouse, move the cursor to the screen’s upper right corner and then move it down. Now, click on Search and look for This PC and then select it.
- On the upper right hand side, type in size:huge, for instance, in the Search box, so it’ll look for files between 1 to 4 GB.
- “Gigantic” (>4 GB)
- “Huge” (1 – 4 GB)
- “Large” (128 MB – 1 GB)
- “Medium” (1 – 128MB)
- “Small” (16 KB – 1 MB)
- “Tiny” (0 – 16 KB)
- “Empty” (0 KB)
- Click on the View menu, choose Sort by, and then click on Size. All the large files would appear at the top.
- Choose the file you wish to delete, press and hold, or right click on it, and then choose Delete.
Reduce the Size of the WinSxS Folder
Before we talk about how to go about this method, it’s important for you to know that deleting files from this folder or deleting the entire folder could damage your device.
- You’d find this folder in your Windows folder on your PC, and it consists of Windows files that help the system in updating and customizing the device. The Task Scheduler is the best way to reduce its size.
- Click on Search after swiping from the right side of the screen or use the mouse to point the cursor to the screen’s lower right corner and then move it up, and click on Search.
- Search for the Control Panel in the box and then select it.
- Click on System and Security, and then choose the “Schedule tasks” option from the Administrative Tools.
- Click on the arrow beside the Task Scheduler Library, choose Microsoft, select Windows, and then choose Servicing.
- Choose StartComponentCleanup and then choose Run under the Selected Item option.
Create OneDrive Files Online With and Without the OneDrive App
Files that you make offline take up the majority of the space, whereas OneDrive only requires 200 MB of storage capacity to sync files. Therefore, it’s better to make files online only. To do so, without the OneDrive app –
- You must disable the “Access all files offline” option from the Settings.
- Before going ahead with this process, make sure there are no pending uploads to OneDrive; otherwise, wait for it to complete.
If you wish to use the app for this method,
- Click on OneDrive on the Start screen to open the app.
- Search for the file or folder you wish to make online.
- Select the file or folder by Swiping down or right clicking on it.
- Choose the Make Online Only option. If you wish to make the entire OneDrive online, then swipe from the screen’s right edge or move the cursor to the screen’s lower right corner, and then move it up. Click on Settings, select Options, and then choose the “Make all file online only” option.
Make Files Online Using File Explorer
Apart from OneDrive, you can also make files online in the following way –
- Swipe from the screen’s right edge and click on Search. Mouse users can move the cursor to the screen’s upper right corner and move it down, then select Search and input File Explorer in the bar. Open File Explorer.
- Now, go to the file or folder you want to make online only.
- Press and hold or right click on it to select it and click on Make Available Online Only.
Shift Your OneDrive Files to an External Drive
First of all, ensure that the external drive has enough storage capacity and that it’s formatted with the NTFS file system. Here’s how you can check the storage capacity of the drive –
- Swipe from the screen’s right edge and click on Search. Mouse users can move the cursor to the screen’s upper right corner and move it down, then select Search and input File Explorer in the bar. Open File Explorer.
- Right-click or press and hold OneDrive.
- Click on Properties and check the Size on disk option.
- Now, click on This PC in File Explorer and check the space in the removable drive.
Here’s how to shift the OneDrive contents.
- Create a new folder in the external drive.
- Now, press and hold or right-click on OneDrive.
- Click on Properties, and then choose Location.
- Click on Move.
- Go to the removable drive and click on Select Folder.
- Choose OK in the OneDrive Properties dialog box.
- Click on Yes in the Move Folder dialog box. All your OneDrive files are stored in the external drive now, and you can delete the old OneDrive.
Add More Storage
For long term success, you should add external storage space, such as SD cards, DVDs, CDs, cloud storage, etc. Here’s more about these options.
1. SD Cards
There are various types of Secure Digital Cards, and they are: SD (32.0×24 mm), miniSD (21.5×20 mm), and microSD (15.0×11 mm). So choose the one that is compatible with your PC.
2. USB and External Drives
You might have noticed your PC has one or two USB ports to plug in a USB or external drive. There’s a 3.0 USB port as well, which is faster and more efficient in transferring files. You can plug in a 2.0 flash drive to this 3.0 port, but not vice versa. Check with your PC manufacturer to know which port is compatible with your computer.
3. DVDs and CDs
A CD, DVD, or Blu Ray disk works similarly to a USB or external drive if it can read and write in free space. After inserting an empty disk into the device, choose the Like a USB Flash Drive option from the menu that pops up.
4. Cloud Storage using OneDrive
OneDrive, also known as online storage space, comes along with Windows, where you can save files online. You can use the website OneDrive.com or the apps that come with Windows 8.1 and RT 8.1 or use PC and Mac desktop apps or mobile apps to use this storage.
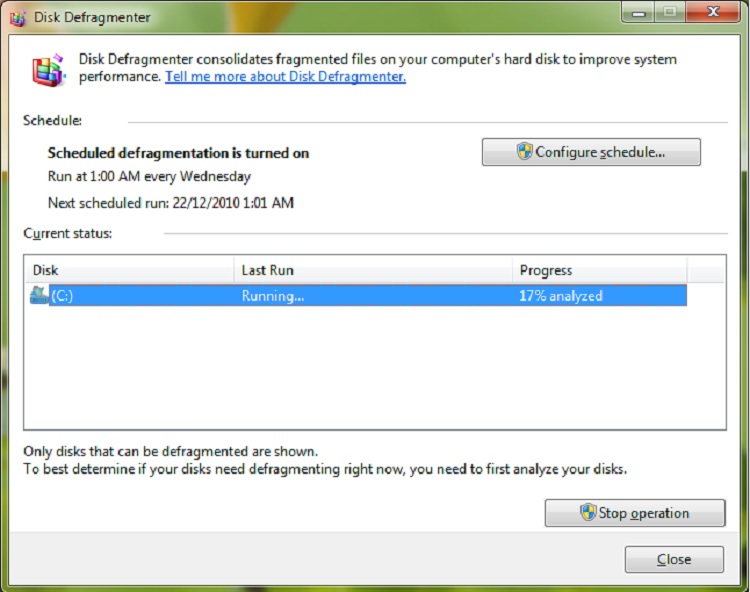
Defragment The Hard Drive
As I previously said, sometimes a hard drive can become fragmented when you are constantly deleting and adding files. However, you can use the Disk Defragmentation tool to understand which drive would benefit from it. Don’t use this tool frequently, though, because it might shorten the lifespan of your hard drive.
- Click on the Windows icon and type Defragment in the search bar.
- Select Disk Defragmenter.
- When the tool’s window appears, click on the drives one by one and check the percentage of fragmentation in them. A higher percentage indicates more fragmentation.
- Click on the Defragment Disk option to undo the fragmentation.
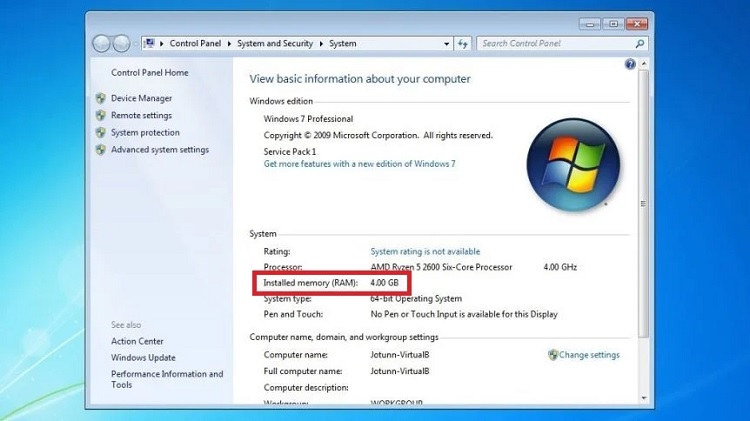
Have Sufficient RAM
RAM is the hardware that manages how the device stores the data and improves your device’s speed and efficiency. But if there’s not much RAM in your computer, then the information would start getting stored in the hard drive instead of the RAM. This would affect your computer’s functioning. Those who use various programs, such as video editing software or rendering software, etc., would require more RAM as compared to a user who only uses it for web browsing or text editing.
- Go to Computer and click on Properties to know how much RAM you have.
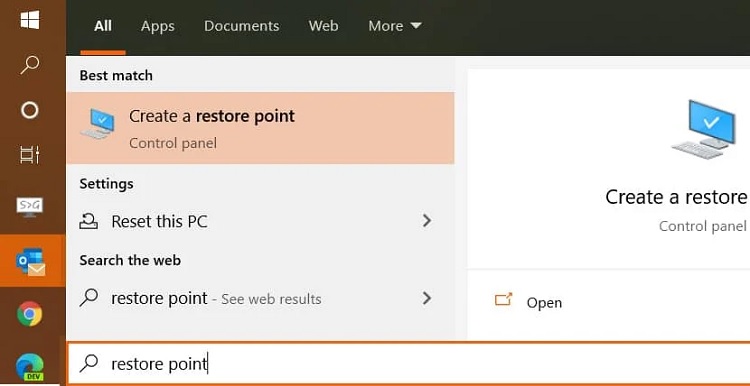
Configure System Restore
If some of your important files are lost due to a recent update, then you can restore these. System Restore retains space in your hard drive, so it’ll function normally even if there’s no free space.
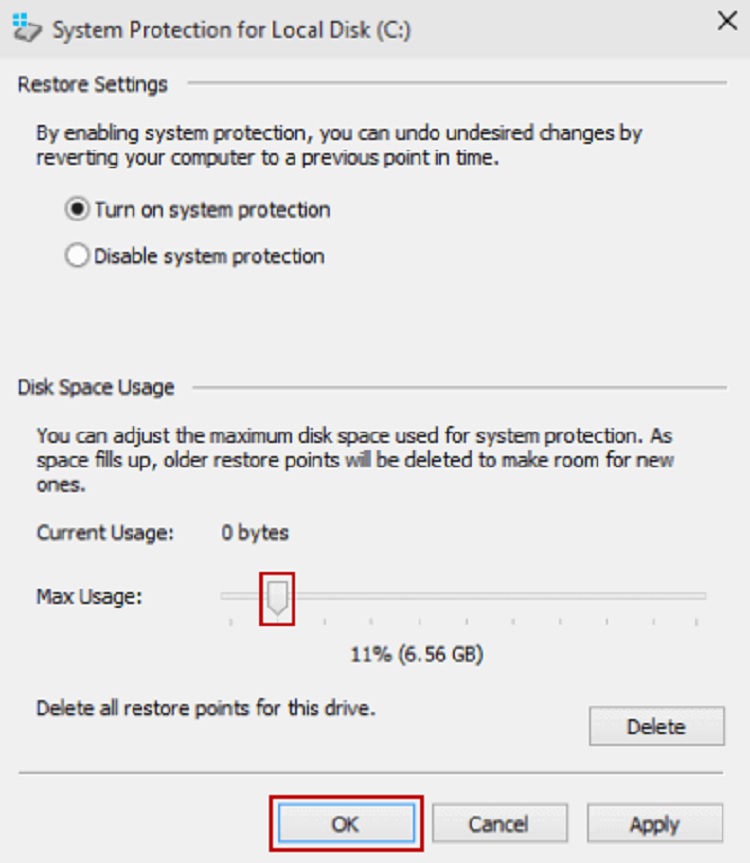
- Input System Protection or Create a Restore Point in the search bar and click on Create a Restore Point.
- Select Configure with your primary Window drive highlighted.
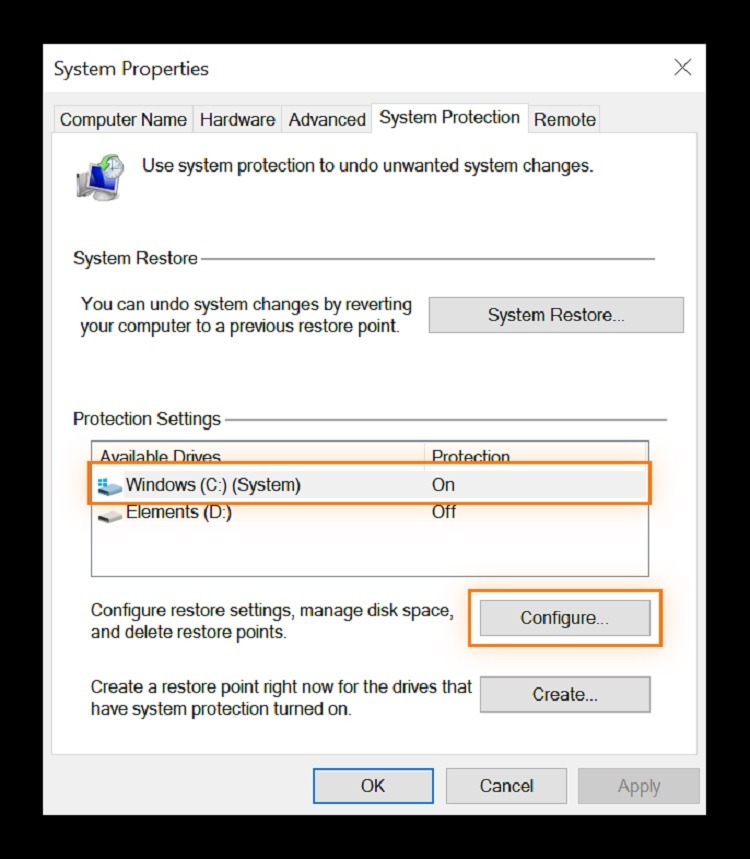
- Use the slider to set the maximum usage amount. By default, this slider would be on optimal usage, which works well, so change it only if you must.
Maintaining Your Device
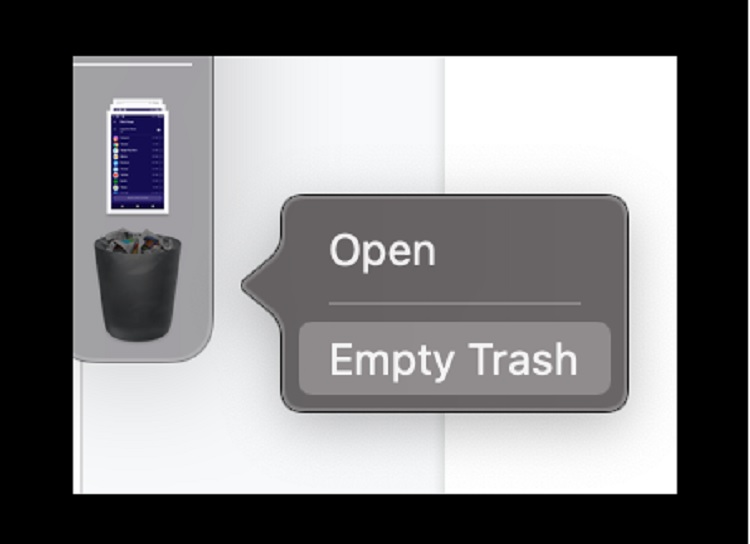
All these ways to free up disk space on PC are excellent, but what would really help is to maintain this condition of your device by deleting unnecessary or junk files, duplicates videos or photos, downloads, and so on from time to time. You’ll see the difference in your device’s speed and efficiency. Also, don’t forget to empty the recycle bin; otherwise, there’s no point in deleting anything.
Here’s how to empty the trash –
- Right-click on the recycle bin icon on Windows or the trash icon on Mac.
- Click on Empty Recycle Bin or Empty Trash.
Sometimes when you’re deleting large files on an external HDD, the system might remind you that you’re about to permanently delete this file, so make sure you understand the gravity of it.
Conclusion
We hope you no longer have this question as to how to free up disk space because all the methods that are beneficial and you could easily use are mentioned above. You can go for the ones you find easier or more convenient because, at the end of the day, the only thing that matters is free space in your hard drive or hard disk.


